Sunday, March 25, 2012
Mustache + Lips
A friend of mine recently had twins (her second set!) and I had a fun idea for onesies. I think they turned out pretty darn cute if I do say so myself. I used knit for the applique and just stitched along the edge and stitched through the middle of the lips. This was really quick and easy and fun.
Please forgive the bad photos. I was in a bit of a rush. You can get the artwork for these cuties here.
Thursday, March 15, 2012
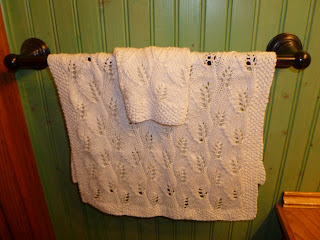
Lace Hand Towel
This towel and wash cloth set was a fun project for practicing lace knitting. I choose a lace pattern from my pattern stitch collection and added a seed stitch border. This would be a great project to practice a lace pattern for your next sweater project. I could really see the stitches (and the mistakes) by the time I finished this simple project. This small project would also be useful for practicing reading charts. Choose your lace pattern and multiply the stitch count by the number of repeats you will make then add 4 to 8 stitches for the border and each side. Cast on your stitches and start with a 4 to 8 row seed stitch border. Keeping 4 to 8 stitches in your seed stitch pattern at each side continue with the lace pattern until you reach your desired length. Finish the towel with your seed stitch border. This is an easy way to sharpen your lace making skills. This project was made with a cotton and bamboo blend yarn that is very soft with great drape. I had enough yarn to make a matching wash cloth.
Thursday, March 8, 2012
Baby Bibs Galore
A good friend recently had her second set of twins! To celebrate the arrival I used the pattern Sylvia used last year from Chick Pea Studio and made a boy and girl bib from fat quarters I had in my stash. The backing is simply a soft and absorbent flannel. The construction is very easy. Simply place the bib and lining right sides together and stitch around the edge using a 1/4 inch seam allowance leaving about a 2 inch opening for turning. Be sure to trim the seam allowance and notch around the curves to make turning easier. The notching will help you keep the curves smooth and keep your finished bib looking great.
A little secret in turning your bib is to roll the front very slightly to the back as you press so that when you top stitch none of the lining peeks out. Press well when you have it all turned and top stitch very close to the edge. I used snaps for the closure but you could use Velcro if you like.
I made up a couple extra while I was in the mood so I have a gift stash started when I want something hand made to add to a gift the next time a baby arrives.
Subscribe to:
Posts (Atom)


